| Table of Contents |
|---|
...
Environment is a label within SpringServe and does not result in automatic targeting based on user agent or device ID.
On your managed supply tags, you must specify the environment where the tag will run: Desktop, Mobile Web, In-App, or Connected TV. Selecting the environment will specify the response type of the tag. For desktop and mobile web JS VPAID will return; CTV and in-app tags are VAST Only. You have the ability to override these settings; expand the Advanced section and the Response Type field will be revealed.
Note that the VPAID for your connected supply depends on the settings on the managed supply tag that is selling to your DirectConnection.
...
If you are working with a direct publisher, you may want to implement a custom Timeout Setting. If you do not set a custom timeout, SpringServe will not close the VPAID unit until an impression is filled or it has gone through all levels in the waterfall.
To report Key-Value on data, you must declare the Key(s) on the Supply Tag level. In the Settings tab of a Supply Tag, select the keys that you would like to report on in the Advanced section. You are limited to 5 keys per supply tag for reporting. In addition to reporting, you will also want to declare keys if any demand is using custom key-value targeting. Declare those keys in the Keys field and they will be included in the export tag so they get passed to the demand stack.
...
Set your Waterfall Management to Demand Tag or Campaign. If you manage your demand by campaign, Campaign management will allow you to add all demand tags within a campaign - only demand tags belonging to campaigns can be added to these waterfalls. Demand Tag management allows addition of individual demand tags to the waterfall. Note that once a tag is saved the waterfall management cannot be changed.
IVT Options
IVT settings on new supply will use the Default Settings of your account. You can override these defaults for pre-bid IVT filtering and post-imp detection in the IVT Options section.
To use Pre-Bid IVT Blocking, set it to enabled in the IVT Options section. Post-Imp IVT Detection analysis is conducted after the impression occurs to determine if it is IVT. When post-imp is enabled, impressions will be analyzed by your selected vendor(s) at the sampling rate specified. You will be able to run reports to determine domains against which to optimize. Note that Post-Imp IVT data has a delay of 8 hours.
When you enable Pre-Bid IVT Blocking, the request is analyzed when it comes into the ad server. If it is deemed to be IVT, then the request will be blocked and an empty VAST response will be returned. Pre-Bid IVT blocking is good to use if your Demand Partners are especially sensitive to receiving IVT traffic.
...
In the Demand tab, associate your demand and set up your waterfall. Existing supply tags also display summaries of performance. You can look at these quickstats summaries as a table or a graph. Read more about Graph Views.
Add Demand
For supply tags with Demand Tag waterfall management, click the "+Demand" button to align Demand Tag(s) to your Supply Tag; you can either copy from existing demand or select tags manually. If you choose the latter, a modal will pop up, and you can select which demand to associate with your supply.
When you are choosing your demand, the modals automatically filter for rates that will not result in loss to you. For example, if you are aligning demand to a supply tag with a rate of $6, the demand tag modal will automatically filter for demand tags with rates $6 and above. You can change the rate by which to filter and any tag that has a rate that will result in a negative margin will be highlighted in red.
Note that the default view for the demand tag modal is for active tags. If you expect to see some demand tags that do not appear, select Any status or Inactive from the dropdown.
...
Once you have added your demand, you can arrange them in the waterfall in tiers.
Demand Tag Waterfall Management
For VAST Only supply tags, SpringServe will execute a broadcast call to the demand tags in tier order. For VPAID supply tags that have demand tag waterfall management, you can set the priority within a tier.
On managed tags and DC tags without auto-opti enabled, demand tags have a lock icon to the right of their priority. Clicking this icon will lock the tag in place. Optimization can be enabled on the supply tag and any locked demand tag will remain at its current priority and tier. This feature allows for easier A/B testing – lock in two demand tags at the same priority to distribute requests evenly and see which tag performs better. Note that you cannot change the priority of a locked tag, so click the icon to unlock it before changing its priority.
You can have more than one demand tag at the same priority and tier. Tags at the same priority will be called in a round robin fashion, meaning that they will be called with an equal probability (provided the demand tags have the same targeting). Putting tags at the same priority and tier will allow you to do an A/B test and see how different tags perform at the same tier in the waterfall. New demand tags are assigned priority 1 within their partner's default tier. You may have an idea of what's going to perform best and if so, arrange your waterfall based on this knowledge. If you do not know what will perform best, you can leave all tags at the same priority and you can rearrange your waterfall after your tag sees some volume.
If a demand tag is aligned to a supply tag with a CPM above its RPM, it will be highlighted in red. This feature provides a visual warning that a supply-demand relationship will result in a negative margin to you.
Campaign Waterfall Management
On campaign managed waterfalls, all demand tags in a campaign will be placed in the same tier and SpringServe executes a broadcast call.
...
- Player Aspect Ratio: Here you could target from a list of aspect ratios, which is calculated as the ratio between width and height: width / height. Tall skinny players have a smaller aspect ratio value and short wide players have a larger aspect ratio.
- DMA Targeting
- Device Type: Device Targeting allows you to select specific device types to target.
- Computer
- Mobile
- Connected TV
- TableIn-app
- Mobile Web
- CTV
- Games Console
- Set-top Box
- Tablet In-app
- Tablet Web
- Other
- Operating System (OS)
- Android
- iOS
- Linux
- Windows
- Mac OS X
- Chrome OS
- Fire OS
- Xbox OS
- Tizen (Samsung)
- Roku OS
- Other
...
Click the buttons for the macros you would like to be passed and they will automatically fill in with the appropriate keys and macros and the export tag can be exported to your supply partner or the player.
Routers
The Routers index table displays the id, name, targeting, and number of supply tags in the router. Columns showing important metrics such as router requests, impressions, and router request fill are also shown. Toggling to the Full view will reveal all targeting and additional performance metrics. Click "+ Router" to add a new router.
Settings
On the settings tab of a router, enter the name and select the supply partner, format, and environment. Once a router has been saved, the partner and format cannot be changed.
Event Pixels, reporting keys, and notes can also be added to supply routers. IVT and Verification settings can be set on the router or the supply tag level.
Supply
Within a router, you can add supply tags and specify ratios for the inventory split. Supply tags with and without pods are supported in routers.
Add Supply to a router by clicking the "+ Supply" button; a modal will display supply tags of the router's supply partner. Set ratios for each supply tag in the router by entering an integer value in the Ratio column of the index table. The corresponding weight will be displayed in the Weight column. Note that this calculated weight assumes that all supply tags pass targeting. Requests will be split according to these weights.
Fallback supply tags can also be set for each tag within the router by clicking "+Fallback" in the table. If the request to the original supply tag does not fill, it will be sent to the fallback tag.
Targeting
Select targeting options are available on the router level. If targeting is place on the router, a request must pass targeting on the account, partner, and router levels before being set to the supply tag.
...
For additional details on Routers, see Inventory Routers.
Partners
On the Supply Partners tab, you will see a table of your supply partners along with columns showing targeting, the number of associated tags, and performance metrics. Toggling to the Full view will reveal all targeting, budget bar, the number of users, the account managers, and additional performance metrics. Click "+ Supply Partner" to add a new partner.
Supply Tags
Existing supply partners have a Supply Tags tab. Here, you can see a summary of performance for all supply tags that belong to the supply partner. You can look at these quickstats summaries as a table or a graph. Read more about Graph Views.
All tags are shown in the table on this tab, and metrics will update when you change the time range. New supply tags can also be created for this supply partner from this tab.
Settings
When adding a Supply Partner to your account, enter in the name and choose an available user as the Account Manager(s). If available, choose supply tags to associate to the partner by selecting them in the table. Use the search bar to filter the available tags.
Auto Optimization Defaults
SpringServe supply tag optimization reprioritizes the waterfall depending on the Optimization parameters. If you would like to use your account default optimization metrics, no actions need to be taken.
There is not a one size fits all set of parameters for optimization. Based on your supply, you may want to use a different optimization metric. You can set custom partner Optimization parameters by toggling to Custom in the Optimization Defaults section for the partner.
Note that any changes made to Optimization Defaults on both the account and partner level will apply to newly created supply tags and connected supply; no changes will be made to existing supply tags. If you would like to make a bulk update to existing tags, use bulk actions.
Targeting
Select targeting options are available on the supply partner level. If targeting is in place on the supply partner, a request must pass targeting on both the partner level and the tag level.
Labels
You can assign multiple labels to each supply. Example use cases include labels for outstream, direct, testing, etc.
You can assign a tag to a label from both the label side and the tag side. On the Supply Labels tab, you can create a new label by clicking "+Supply Label". Creating a new label or selecting an existing label, will bring you to its Settings tab, where you can edit the name of your label. On the Supply Tags tab, you will see tags that are already associated to a label appear in the table on this tab. You can add tags to the label by clicking "+Supply" and a modal will appear.
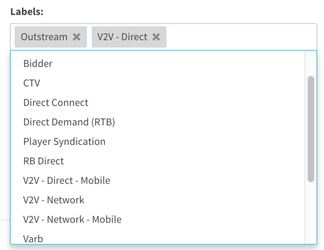
From the tag side, you can assign labels in the settings tab. Clicking in the Labels box shows your available labels.
You can filter by label in the Add Supply modals when aligning your supply.
Reporting is available for labels both as a dimension and a filter. When running a report for a tag that has multiple labels, you will see one line per label; the metrics for both lines will be the same. Note that reporting currently results in inflated totals; i.e., if you have two labels on a tag, the total will be inflated by a factor of two.